Overview
The Coded Control Panel is a decorative block similar to the Control Panel, but it can host up to four functional items instead of one. Inserted items are rendered directly onto the surface of the panel while preserving their relevant functionality. See Control Panel Panels for a list of items that provide functionality when installed in a Coded Control Panel.
Internally, the Coded Control Panel utilizes the functionality of Binary Encoder and Binary Decoder to exchange information between its installed items and the external Redstone Dust or RedCu Wire network.
When a Redstone signal is provided to the Coded Control Panel, that signal is treated as a four-bit binary value and split into four separate channels. Each channel is then converted into a boolean Redstone signal, where 0 remains 0 and 1 becomes 15, and supplied to the corresponding installed item.
Likewise, when installed functional items provide boolean Redstone signals, those signals are encoded back into a single Redstone signal and output by the Coded Control Panel.
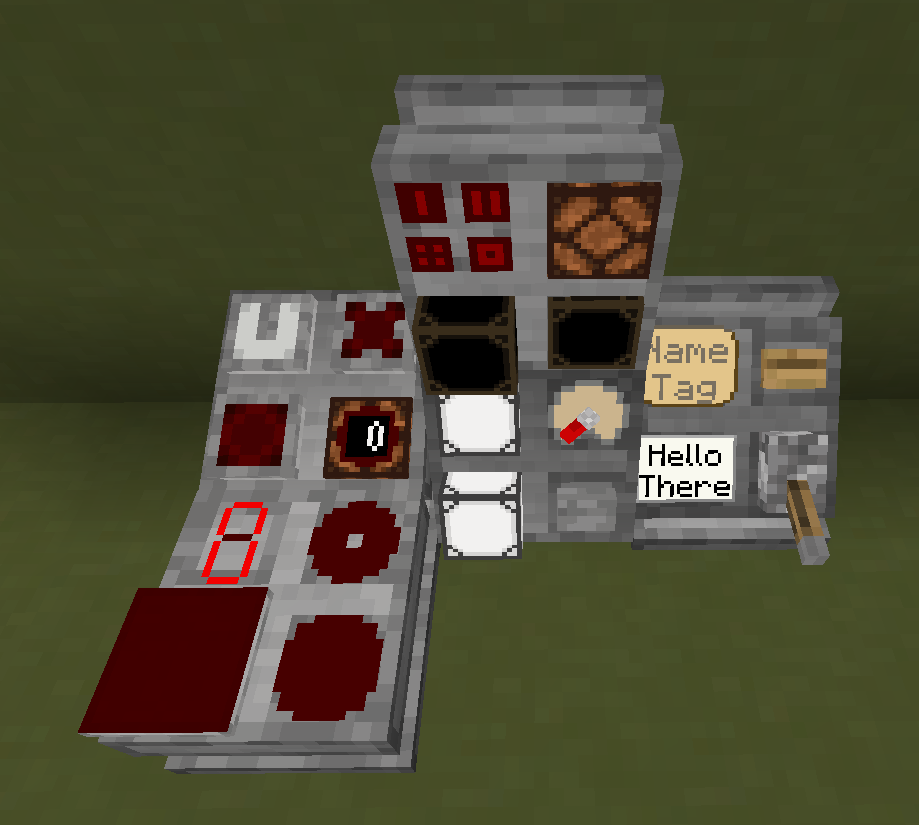
Example
Consider a Coded Control Panel containing the following items:
A Redstone signal of 5 is provided to Pin Mark A.
First, the signal is interpreted as a binary value: 0101
Next, each bit is converted into a boolean Redstone signal where
1 becomes 15 and 0 remains 0: 0 15 0 15
The channels are assigned in reverse order, resulting in:
- Red Button receives 15
- Red Switch receives 0
- Universal Indicator receives 15
- Flat Lamp Indicator receives 0
The Red Button and Red Switch ignore incoming Redstone signals, but the indicators react to them. The Universal Indicator displays a signal level of 15, while the Flat Lamp Indicator remains off.
Now suppose the Red Switch is toggled on and begins providing a Redstone signal of 15.
The items now provide:
- Red Button provides 0
- Red Switch provides 15
- Universal Indicator provides 0
- Flat Lamp Indicator provides 0
These values are converted into binary form where 15 becomes 1 and 0 remains 0: 0010
The binary value is then interpreted as a decimal Redstone signal, producing an output signal of 2 on Pin Mark A.
Be aware that both Redstone Dust and RedCu Wire always adopt the highest signal available to them. If a wire supplying a signal of 5 to the Coded Control Panel receives a signal of 2 in return, the wire remains at a signal level of 5 because 5 is greater than 2.
For this reason, it is recommended to use separate signal lines for signal providers and signal receivers. One Coded Control Panel can be dedicated to receiving signals, while another can be dedicated to providing signals.
If both providers and receivers must be placed on the same Coded Control Panel, use separate incoming and outgoing signal lines and place signal providers in the first slots while placing signal receivers in the last slots. This prevents receiver channels being overridden by stronger outgoing signals.
A Hexadecimal Indicator can be used for monitoring which channels are currently active.
GUI
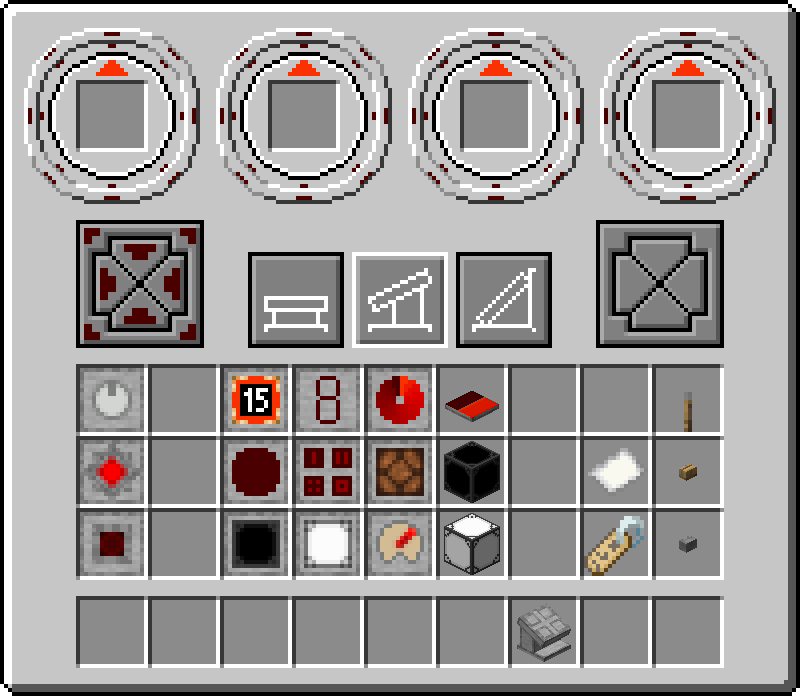
At the top of the GUI there are 4 circular control elements with inventory slots in the center where the functional items are placed. Only a single item is inserted from the held stack.
The circular control element is also used to rotate the functional item. Clicking the outer ring allows the item to be rotated with a precision of 1°, while the inner ring rotates the item in steps of 15°. A red arrow indicates the current rotation of the item.
Above the player's inventory are three buttons that select the shape of the Coded Control Panel.
Two groups of buttons are located to the left and right of these shape selection buttons. These button groups are used to configure individual Pin Marks.
The left-side button group always controls the pin marks used by Shape 1 and Shape 2, while the right-side button group is only used by Shape 3.
When using Shape 3, the meaning of the button groups depends on the current orientation:
- If the panel connects a wall with the floor or ceiling, the left-side buttons control the top or bottom pin marks, while the right-side buttons control the wall-side pin marks.
- If the panel connects two walls, then when viewed from the front of the panel, the left-side buttons configure the left-side pin marks and the right-side buttons configure the right-side pin marks.
Configuration
Shift + right-click with an empty hand will change the shape of the block.
Using a Rotation Bracket rotates the block differently depending on the currently selected shape:
- Shape 1 - Does not rotate
- Shape 2 - Rotates around its local Y-axis
- Shape 3 - Rotates around the world Y-axis
Right-clicking the block with any other item or an empty hand opens the configuration GUI.
After inserting items, changing their orientation or changing the shape, player can transfer the configuration to an Coded Control Panel item by right-clicking the Coded Control Panel block with Coded Control Panel item.
When the configuration is copied:
- The item receives an enchantment glow effect.
- The item description displays the inherited configuration.
Placing the item as a block will apply the stored configuration to the newly placed Coded Control Panel. If the configuration includes items, the items from the players inventory will be transfered to the block if the player has the required items.
Crafting
| Ingredients | RedCu Crafter Recipe |
| 1 Control Panel | |
| 1 Binary Encoder | |
| 1 Binary Decoder |
Adventure Mode
While in adventure mode, /redstonecg_adventure controls:
/redstonecg_adventure gateGUI false- Disables GUI./redstonecg_adventure valueConfig false- Blocks item right-click interaction./redstonecg_adventure pinConfig false- Removes pin configuration buttons and shape configuration.
Data
Block State
Registry name: redstonecg:coded_control_panel
Block properties:
waterlogged(false|true): determines whether the block is waterlogged.orientation(0-41): encodes the model, facing and rotation of the block.
orientation
Values 0-5 are used by Shape 1.
Each value determines the direction of the block's base face in order: Down, North, East, South, West, Up.
Values 6-29 are used by Shape 2.
The range is divided into six groups of four values, with each group
determining the direction of the block's base face:
6-9: Down10-13: North14-17: East18-21: South22-25: West26-29: Up
Within each group, the value determines the clockwise rotation around the block's local Y-axis:
0°:6, 10, 14, 18, 22, 2690°:7, 11, 15, 19, 23, 27180°:8, 12, 16, 20, 24, 28270°:9, 13, 17, 21, 25, 29
Values 30-41 are used by Shape 3.
The range is divided into three groups of four values:
30-33: one of the base faces faces Down.34-37: both base faces face walls.38-41: one of the base faces faces Up.
Within each group, the value determines the clockwise rotation around the world Y-axis:
0°:30, 34, 3890°:31, 35, 39180°:32, 36, 40270°:33, 37, 41
Block Entity
Structure:
-
id: block entity identifier -redstonecg:coded_control_panel -
x: X coordinate of the block entity. -
y: Y coordinate of the block entity. -
z: Z coordinate of the block entity. -
connection: sets the Pin Mark configuration. -
Items: contains the placed Control Panel Panel item. Each item also contains aSlotidentifying its inventory slot. -
slot_angles: contains the rotation of each Control Panel Panel in radians. -
schedule: contains scheduled slot events. Each event contains a relative execution time and an inventory slot. When an event is executed, the associated inventory slot is updated and the event data is removed.-
tick: contains the relative execution times of scheduled events in game ticks. A value of0means that the event executes on the same game tick as the previous event. -
slot: contains the inventory slots associated with scheduled events.
-
connection
For Shape 1 and Shape 2, the least
significant four bits along with another bit of connection are used to configure
connections in the local frame:
- Bit
0: forward - Bit
1: right - Bit
2: left - Bit
3: back - Bit
6: base face
For Shape 3, the entire byte is used and is divided
into two groups of four bits. The left plate uses bits
7, 3, 2, 0, representing its connections to the
base face, left, down and up. The right plate uses bits
6, 5, 4, 1, representing its connections to the
down, right, up and base face.
Item
Structure (1.20.4 and older):
-
id: item identifier -redstonecg:coded_control_panel -
Count: the amount of items in this stack. -
tag(Optional): additional item data.-
BlockParameterSet(Optional): set of parameters for placing a block.-
connection(Optional): target Pin Mark configuration of the block. -
orientation(Optional): target orientation of the block. -
slot_angles(Optional): rotation of each placed Control Panel Panel in radians. -
Items(Optional): placed Control Panel Panel item data.
-
-
Structure (1.20.6 and newer):
-
id: item identifier -redstonecg:coded_control_panel -
count: the amount of items in this stack. -
components(Optional): item data components.-
minecraft:custom_data(Optional): custom item data.-
BlockParameterSet(Optional): set of parameters for placing a block.-
connection(Optional): target Pin Mark configuration of the block. -
orientation(Optional): target orientation of the block. -
slot_angles(Optional): rotation of each placed Control Panel Panel in radians. -
Items(Optional): placed Control Panel Panel item data.
-
-
-
Version Log
| Version | Description |
| 0.3.3 | Introduced. |